NOTE: This guide is not tested for Ubuntu, but should work the same way.
I recently upgraded Linux Mint to version 18. As with the previous time I upgraded the OS, I wanted to upgrade PostgreSQL and PostGIS as well. If you are upgrading from a previous version of PostgreSQL/PostGIS and have data you want to bring over to your new cluster, you have to begin with a dump of your old data. In the terminal:
pg_dump -Fc my_db > my_db.backup
The extension *.backup is arbitrary, but is the one that is expected by pgAdmin.
After that the next step for me was installing Linux Mint 17. If you’re not installing/upgrading an OS, your next step might involve going straight to installing/upgrading PostgreSQL 9.5/PostGIS 2.2. If you are not yet using the ubuntugis-unstable PPA, go ahead and set that up. This will give you access to the latest PostGIS, GDAL/OGR drivers, SpatiaLite, QGIS, etc. In spite of the name, the repository is very stable and widely used.
sudo add-apt-repository ppa:ubuntugis/ubuntugis-unstable
sudo add-apt update
Then install PostgreSQL and PostGIS:
sudo apt-get install postgresql-9.5-postgis-2.2 postgresql-contrib-9.5 pgadmin3
Since the PostGIS package depends on PostgreSQL, you should get everything you need. If you use pgAdmin III for server management, that has to be added separately, as I have done here.
Before you can restore your database you have to have a cluster to restore it to. When you install Postgres on a Debian-based Linux distro, the installer will automatically create a database cluster named main with a data directory in /var/lib/postgresql/9.5/main. But it’s fairly common to run a server with a small root partition, and have the database cluster, which can grow very large, on a separate data partition. If you follow the PostgreSQL docs for initializing a new cluster, it will work, but your new cluster will not start at system startup, and if your database client connects to localhost:5432 the connection will go to the default cluster created during installation.
WARNING: I am about to show you how to delete a database cluster. This assumes that you have done a fresh install and the
maincluster created during install is empty, or that you have a backup of your database as I demonstrated at the beginning of this article. If you are attempting an upgrade (i.e., not a fresh install) but do not know whether your data is backed up, STOP and make sure that you have a backup!
First, decide where you are going to store your data. PG documentation recommends not creating a cluster at the root of a partition. For example, if you want to have your cluster on a partition named /data, you should create your cluster in a folder on that partition, not as the root folder /data. In the example below, I create a cluster named pg_data. A folder of this name should not exist,* and will be created for you.
sudo pg_dropcluster --stop 9.5 main
sudo pg_createcluster -d /data --start 9.5 pg_data
The first statement will stop the default cluster and drop it (destroying all data in the process). The second statement will create the folder /pg_data in the /data partition, set the folder owner to the postgres system user, initialize the cluster, and start it. New clusters are assigned the next available port beginning with 5432. Because we have dropped the default cluster, the new cluster will be assigned port 5432. If you did not drop the default cluster, or have other clusters on this server, the new cluster will be assinged 5433 or the next available port number.
After executing these commands, you can see the results using pg_lsclusters (no options, does not need sudo). If you have run the commands above, you should see the first line in the following output. I have also mocked up what you would see if you create two additional clusters:
Ver Cluster Port Status Owner    Data directory Log file
9.5 pg_data 5432 online postgres /data/pg_data  /var/log/postgresql/postgresql-9.5-main.log
9.5 tmp     5433 down   postgres /data/tmp      /var/log/postgresql/postgresql-9.5-tmp.log
9.5 tmp2    5434 down   postgres /data/tmp2     /var/log/postgresql/postgresql-9.5-tmp2.log
Remember that port
5432is the default PostgreSQL port. Note that the dummy clusters I have “created” above use ports5433and5434, because5432was already taken. If you want to be able to access the database without specifying the port number, make sure to drop the default cluster first.
The cluster will be initialized to use trust authentication, which means that all local users can log in without a password. The cluster will also automatically have a postgres user. It is usually good practice to create a SUPERUSER role to manage the database instead of logging in as postgres. However, we have to log in with postgres at least once to create the SUPERUSER role we will use for the rest of our database management.
Still at the command line, use createuser (a utility command installed installed with PostgreSQL) to create a login role:
createuser -U postgres -P -s superusername
The given options mean:
-U postgres: log in to the server aspostgresto issue theCREATE ROLEstatement-P: prompt for a password for the new user-s: make the new user a SUPERUSER (including CREATEDB and CREATEROLE privileges)
If you set the role name to match your Linux user (e.g. jsmith), you will be able to launch psql without specifying the username. If you also create a database named for the user, psql will automatically log in to that database. Obviously, this is probably something you don’t want to do in an enterprise setting, but can be useful for a development laptop.
Now you need to edit the environment file. In Ubuntu/LM, it will be located in /etc/postgresql/9.5/ (in our example, /etc/postgresql/9.5/pg_data), and will need to be edited as root. The file is named environment (no extension, just “environment”). Open it and add the following two lines:
POSTGIS_ENABLE_OUTDB_RASTERS=1
POSTGIS_GDAL_ENABLED_DRIVERS=ENABLE_ALL
Close and save. Now restart the postgres service, or just reboot, so that postgres restarts using the new cluster.
With a typical PostgreSQL dump/restore, the restore will create the database and load any functions, as well as schemas and data. When upgrading the PostGIS extension, the new PostGIS version will have different (and possibly incompatible) spatial functions, so we want to:
- Create the database
- Enable the new PostGIS extension to create the new spatial functions and necessary structures (such as the
spatial_ref_systable) - Only then do we load the data, which we do using a special script rather than the standard
pg_restorecommand.
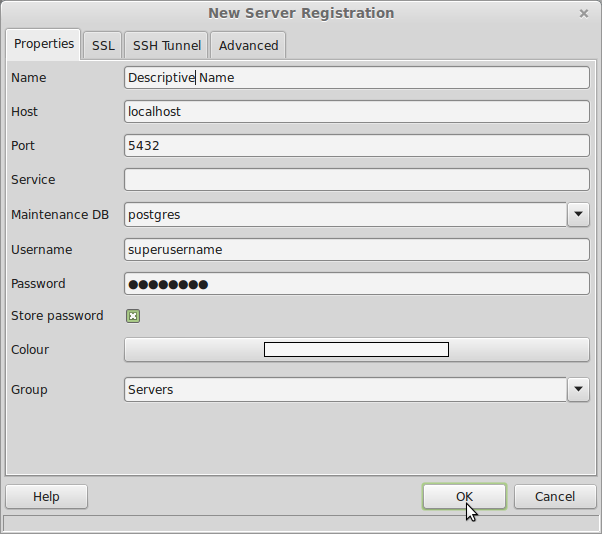
I do the following steps in pgAdmin. First, create a connection to the server:
In pgAdmin it is easy to create a database graphically (not shown here) by right-clicking on the Databases “can” and choosing New Database, or just open the SQL Editor window to follow the commands below. If you prefer to use psql, now that you have added your system user as a database superuser, you can
psql postgres
Either way, you end up at a SQL editor. You are in the postgres database, which should be used only for system data, so create a new database to store your “real” data.
CREATE DATABASE my_db WITH OWNER superusername;
Now create the necessary PostGIS extensions. The only one that is really necessary is PostGIS. Some other ones commonly used for geospatial analysis include:
- Topology support
- The TIGER geocoder (which requires the
fuzzystrmatchextension) - SFCGAL for 3D analysis (which used to require jumping through a lot of hoops, but is now quite easy to install)
You need to issue the SQL commands in the correct DB, so in pgAdmin, close the SQL Editor, connect to the new database, and reopen the SQL Editor. Or, in psql:
\connect my_db
Now create the extensions:
CREATE EXTENSION postgis;
CREATE EXTENSION postgis_topology;
CREATE EXTENSION fuzzystrmatch;
CREATE EXTENSION postgis_tiger_geocoder;
CREATE EXTENSION postgis_sfcgal;
If you are restoring a previous database, now you are ready to reload your data. PostGIS provides a Perl data loader, postgis_restore.pl, that will not attempt to recreate the spatial functions, since they are already there (although deprecated functions will be missing and will require special handling if you have database applications which make use of them). Any aspatial data will be loaded in the usual manner, so it is harmless to use this instead of pg_restore. The data loader will not, by default, be in your PATH, so either navigate to the PostGIS contrib directory, as I show below, or be prepared to type in the entire path when you call the command. Then pass in the name of the dump file and pipe the result to psql:
cd /usr/share/postgresql/9.5/contrib/postgis-2.2/
perl postgis_restore.pl ~/my_db.dump | psql -U superusername my_db 2> ~/postgis_restore_errors.txt
Go get a cup of coffee. In fact, go out to dinner. Maybe see a movie.
The PostGIS installer also installs the graphical shapeloader (front end to shp2pgsql-gui). As a final tweak, you might want to configure this as a pgAdmin plugin, so that you have easy access to it when working with pgAdmin (and it will launch with the database connection details taken from the pgAdmin environment). To do so, open (as root) the file /usr/share/pgadmin3/plugins.d/plugins.ini. Then add the following section:
;
; pgShapeLoader (Linux):
; Added manually by <user> on <date>
Title=PostGIS Shapefile and DBF loader
Command=$$PGBINDIR/shp2pgsql-gui -U $$USERNAME -d $$DATABASE -p $$PORT -h $$HOSTNAME
Description=Open a PostGIS ESRI Shapefile or Plain dbf loader console to the current database.
KeyFile=$$PGBINDIR/shp2pgsql-gui
Platform=unix
ServerType=postgresql
Database=Yes
SetPassword=No
This will create a new entry in the pgAdmin Plugins menu.
That’s it! You should now have a working PostGIS installation. The first thing I did was fire up QGIS, connect to the database, and load some of my old projects to make sure everything was working. Happy geoprocessing!
* pg_createcluster can be used to bring an existing PostgreSQL data directory into the cluster management architecture. However, if you are doing a major upgrade of PostgreSQL or PostGIS, you need to do a dump and restore anyway. You cannot upgrade the cluster “in place”. So these instructions emphasize creation of a new, empty cluster, followed by a restore of your old database. For information on bringing an existing data PostgreSQL data directory into the cluster management architecture, please read the pg_createcluster documentation.
References:
- PostGIS docs for PostGIS isnstallation specifics – http://postgis.net/docs/manual-2.2/postgis_installation.html
- PostgresOnline for configuring the Shapefile Loader plugin – http://www.postgresonline.com/journal/archives/180-PgAdmin-III-1.13-change-in-plugin-architecture-and-PostGIS-Plugins.html
- PostgreSQL docs and various StackExchange fora including Ask Ubuntu and Database Administrators for sundry bits and pieces.